Ford Mustang (1999-2004) Service Manual: 2-3 Accumulator
Removal
1. Remove the main control valve body. For additional information, refer to Main Control Valve Body in this section.
2. Remove the 2-3 accumulator piston retainer.
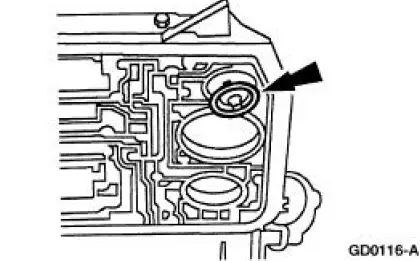
3. Remove the accumulator piston and spring.
Installation
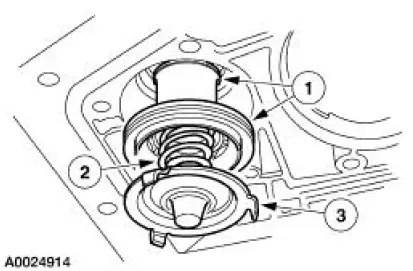
1. Install the 2-3 accumulator assembly.
1. Install the accumulator piston.
2. Install the accumulator piston spring.
3. Install the accumulator spring retainer.
2. Install the main control valve body. For additional information, refer to Main Control Valve Body in this section.
 1-2 Accumulator
Removal
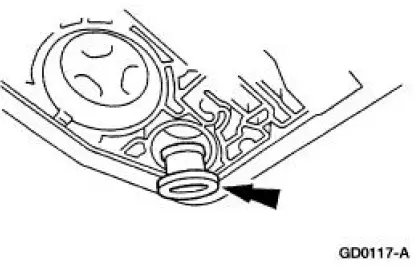
1. Compress the 1-2 accumulator cover and remove the accumulator piston
retaining ring.
2. NOTE: Note the location of the 1-2 accumulator springs for
reference during assembly.
Remove the ...
 Transmission Support Crossmember
Removal and Installation
1. Raise and support the vehicle. For additional information, refer to
Section.
2. Support the transmission with a suitable transmission jack.
3. Remove the crossmember.
...
Other materials:
Door Speaker - Upper
Removal and Installation
1. Remove the front door trim panels (239420). For additional
information, refer to Section
2. Remove the upper speaker access cover.
3. Remove the upper speaker housing.
1. Remove the screw.
2. Remove the upper spea ...
Installation
1. Install the intake manifold and gaskets, tighten the bolts in the sequence
shown.
2. NOTE: The O-ring is to be installed on the top of the thermostat.
Install the water thermostat and the O-ring.
Install a new O-ring as necessary.
3. Install the wa ...
Fuel Pressure Sensor
Material
Item
Specification
Super Premium SAE 5W-20
Motor Oil
XO-5W20-DSP or equivalent
WSS-M2C914-
A
Removal
WARNING: Do not smoke or carry lighted tobacco or open flame of
any type when
working on or near any fuel related compo ...
