Ford Mustang (1999-2004) Service Manual: 1-2 Accumulator
Removal
1. Compress the 1-2 accumulator cover and remove the accumulator piston retaining ring.
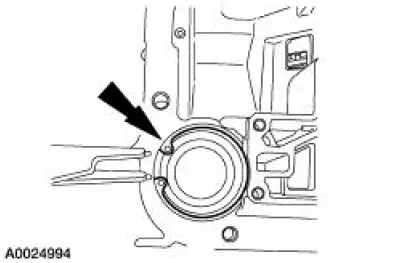
2. NOTE: Note the location of the 1-2 accumulator springs for reference during assembly.
Remove the 1-2 accumulator.
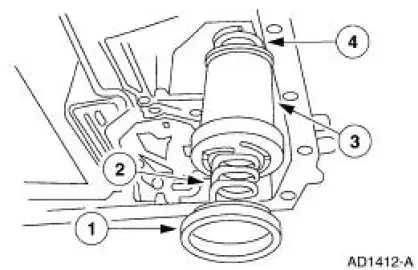
1. Remove the 1-2 accumulator cover.
2. Remove the lower 1-2 accumulator spring.
3. Remove the accumulator piston.
4. Remove the upper 1-2 accumulator spring.
Installation
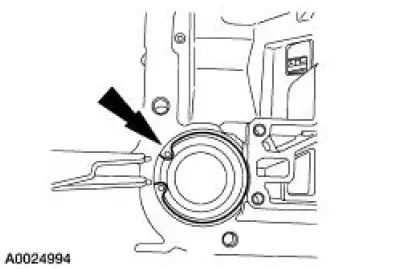
1. Install the 1-2 accumulator.
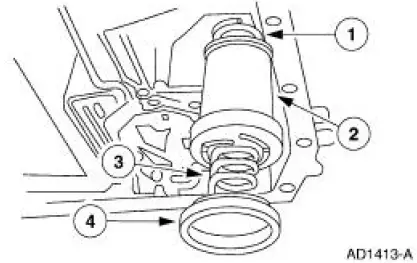
1. Install the 1-2 accumulator upper spring.
2. Install the accumulator piston.
3. Install the 1-2 accumulator lower spring.
4. Install the cover and seal assembly.
2. Compress the accumulator and install the accumulator piston retaining ring.
 Overdrive Servo
Special Tool(s)
Remover/Installer, Servo
Piston
307-251 (T92P-70023-A)
Removal
1. Remove the main control valve body. For additional information, refer
to Main Control Valve
Body ...
 2-3 Accumulator
Removal
1. Remove the main control valve body. For additional information, refer to
Main Control Valve
Body in this section.
2. Remove the 2-3 accumulator piston retainer.
3. Remove the accumulato ...
Other materials:
HomeLink® wireless control system
WARNING: Make sure that the garage door and security device
are free from obstruction when you are programming. Do not
program the system with the vehicle in the garage.
WARNING: Do not use the system with any garage door opener
that does not have the safety s ...
Fittings - R-Clip
Material
Item
Specification
SAE 5W-20 Super Premium
Synthetic Blend Motor Oil
XO-5W20-QSP or equivalent
WSS-M2C153-
H
Disconnect
WARNING: Do not smoke or carry lighted tobacco or open flame of any
type when
working on or near any fuel- ...
Torque Converter (Description and Operation)
The torque converter transmits and multiplies torque. The torque
converter is a four-element device:
impeller assembly
turbine assembly
reactor assembly
clutch and damper assembly
The standard torque converter components operate as follo ...
