Ford Mustang (1999-2004) Service Manual: Air Conditioning Line (Peanut) Fitting
Disconnect
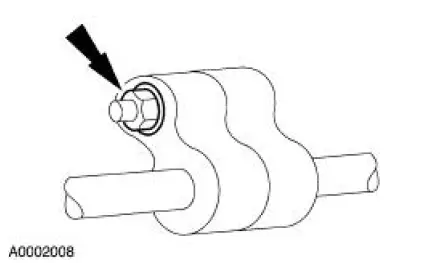
1. CAUTION: Support the female fitting with a wrench to prevent the tubes from twisting.
Remove the nut from the peanut fitting.
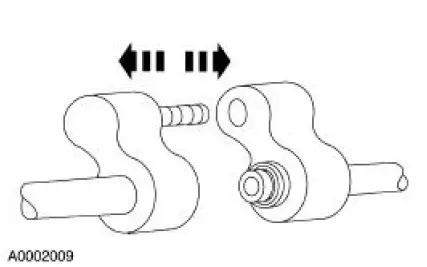
2. Pull the peanut fitting apart.
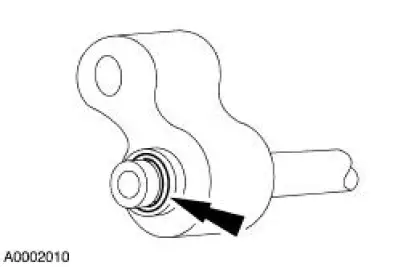
3. CAUTION: Do not use metal tools to remove the O-ring seal. They can cause axial scratches across the O-ring seal groove, resulting in refrigerant leaks.
Remove the O-ring seal with a non-metallic tool.
Connect
1. Clean all dirt or foreign material from the fittings.
2. CAUTION: Use only the new O-ring seals. The use of any O-ring seals other than those specified in the Ford Master Parts Catalog may result in intermittent leakage during vehicle operation.
Install the O-ring seal.
- Lubricate the O-ring seal with PAG Refrigerant Compressor Oil (R-134a Systems) F7AZ- 19589-DA (Motorcraft YN-12-C) or equivalent meeting Ford specification WSH-M1C231- B.

3. Lubricate the inside of the fittings with PAG Refrigerant Compressor Oil (R-134a Systems) F7AZ-19589-DA (Motorcraft YN-12-C) or equivalent meeting Ford specification WSH-M1C231- B.
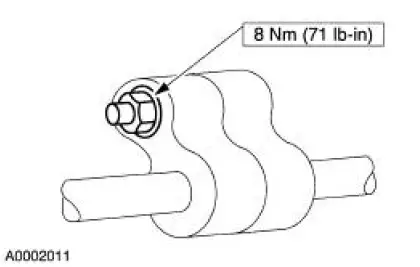
4. NOTE: When correctly assembled, the male and female fittings should be flush.
Assemble the male and female fittings together.
 Heater Hose Coupling
Special Tool(s)
Remover, Heater Hose Inlet
Tube
412-042 (T85T-18539-AH)
Disconnect Tool, Heater Hose
412-127
Material
Item
Specification
MERPOL
-
ESE-M ...
 Refrigerant System Tests
Special Tool(s)
R-134a Manifold Gauge Set
176-R032A or equivalent
1. Connect the R-134a Manifold Gauge Set. For additional information, refer
to Manifold Gauge
Set Connection in this ...
Other materials:
Front Seat Backrest
Removal and Installation
All vehicles
1. Remove the seat. For additional information, refer to Seat-Front Power
in this section.
2. Remove the front seat backrest latch. For additional information, refer
to Latch-Front Seat
Backrest in this section.
...
Crankshaft - Connecting Rod Journal Taper, Out of Round
1. Measure the crankshaft connecting rod journal diameters in two
directions perpendicular to one
another at each end of the connecting rod journal. The difference in the
measurements from
one end to the other is the taper. Verify measurement is within t ...
Fuel Tank Draining
Special Tool(s)
Fuel Storage Tanker
164-R3202 or equivalent
Fuel Tank Drain Hose
310-F013
WARNING: Do not smoke or carry lighted tobacco or an open flame of any
type when
working on or near any fuel-related components. Highly fla ...
