Ford Mustang (1999-2004) Service Manual: Audio Unit
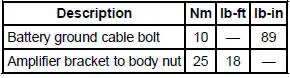
Torque Specifications
Audio System
The Mustang is available with the following audio systems:
- M100 CD AM/FM
- CDX6-AM/FM with six CD in-dash
- MP3 single CD AM/FM (optional)
The M100 system is equipped with four premium speakers. The CDX6 six disc changer audio unit comes with the Mach 460 or Mach 1000 systems and speed-sensitive volume control. The Mach 460 system consists of eight speakers and two subwoofer amplifiers. The Mach 1000 option adds two additional subwoofers and four additional amplifiers located in the luggage compartment.
Refer to the owner literature for complete audio system operating controls and functions.
- Audio Unit (Removal and Installation)
- Subwoofer Amplifier - Convertible
- Subwoofer Amplifier - Mach 1000
 Entertainment System - General Information
Audio System (Diagnosis and Testing)
Refer to Wiring Diagrams Cell 130 , Radio for schematic and connector
information.
Special Tool(s)
73III Automotive Meter
105-R0057 or equivalent ...
 Audio Unit (Removal and Installation)
Removal and Installation
1. Remove the instrument panel center finish panel. For additional
information, refer to Section
2. Remove the audio unit.
1. Remove the screws.
2. Disconnect ...
Other materials:
Removal
NOTE: This procedure applies to both the LH and RH halfshafts.
1. CAUTION: The vehicle must be on level ground and at curb height.
Mark the rear shock absorber relative to the protective sleeve.
During installation, raise the suspension to this reference ...
Thermostat - 4.6L(2V)
Material
Item
Specification
Motorcraft Premium Gold
Engine Coolant
VC-7-A (in Oregon VC-7-B)
(yellow color)
WSS-M97B51-
A1
Removal and Installation
1. Drain the engine coolant. For additional information, refer to Cooling
System Dra ...
Transmission Control Switch
Removal
1. Remove the shifter top control panel.
2. Disconnect the electrical connectors.
3. Remove the shifter bezel.
4. Remove the bulb from the bezel.
5. Disconnect the TCS connector.
6. CAUTION: Extra force may be needed to lift up on the handl ...
