Ford Mustang (1999-2004) Service Manual: Subwoofer Amplifier - Convertible
Removal and Installation
1. NOTE: The convertible top needs to be in the up position to remove the subwoofer amplifiers.
From inside the luggage compartment, remove the forward panel.
1. Remove the pin-type retainers.
2. Remove the forward panel.
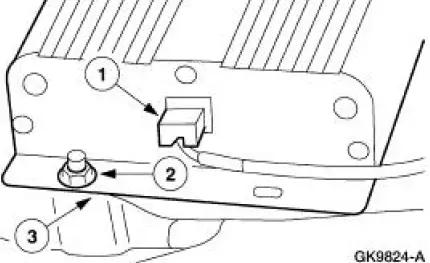
2. NOTE: LH and RH subwoofer amplifiers are similar.
Remove the subwoofer amplifiers.
1. Disconnect the electrical connectors.
2. Remove the nuts.
3. Remove the subwoofer amplifiers.
3. To install, reverse the removal procedure.
Subwoofer Amplifier -Coupe
Removal and Installation
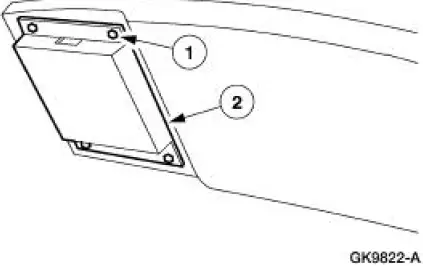
1. Remove the subwoofer amplifier.
1. Remove the screws.
2. Remove the subwoofer amplifier.
2. To install, reverse the removal procedure.
 Audio Unit (Removal and Installation)
Removal and Installation
1. Remove the instrument panel center finish panel. For additional
information, refer to Section
2. Remove the audio unit.
1. Remove the screws.
2. Disconnect ...
 Subwoofer Amplifier - Mach 1000
Removal and Installation
1. Remove the subwoofer assembly.
1. Remove the two attaching nuts.
2. Remove the screw.
3. Disconnect the electrical connectors.
2. Remove the subwoofer ...
Other materials:
Negative and Positive Camber
Camber is the vertical tilt of the wheel (1007) when viewed from the front.
Camber can be positive or
negative and has a direct effect on tire wear.
Caster
Item
Part Number
Description
1
-
Positive caster
2
-
True vertical
...
Engine (Disassembly)
Special Tool(s)
Impact Slide Hammer
100-001 (T50T-100-A)
Remover, Crankshaft Vibration
Damper
303-009 (T58P-6316-D)
Holding Tool, Crankshaft
303-448 (T93P-6303-A)
Guides, Connecting Rod
303-442 (T93P- ...
Bulb
Removal and Installation
1. Remove the floor console. For additional information, refer to
Section.
2. Remove the bolts, then position the bezel upward.
3. Remove the bulb socket from the bezel.
4. Remove the bulb.
5. To install, reverse the removal ...
