Ford Mustang (1999-2004) Service Manual: Starter Motor - 4.6L
Removal
WARNING: When servicing starter motor (11002) or carrying out other underhood work in the vicinity of the starter motor, be aware that the heavy gauge battery input lead at the starter solenoid (11390) is "electrically hot" at all times. A protective cap or boot is provided over this terminal that must be installed after servicing. Be sure to disconnect the battery negative cable before servicing the starter. Failure to follow these instructions can result in personal injury.
WARNING: When working in area of the starter motor, be careful to avoid touching hot exhaust components. Failure to follow these instructions can result in personal injury.
NOTE: When working on the starter system, make sure the anti-theft system is deactivated (if equipped.)
1. Disconnect the battery ground cable. For additional information, refer to Section.
2. Raise and support the vehicle. For additional information, refer to Section.
3. Remove the red starter solenoid safety cap.
4. Remove the starter solenoid nuts and position aside the wires.

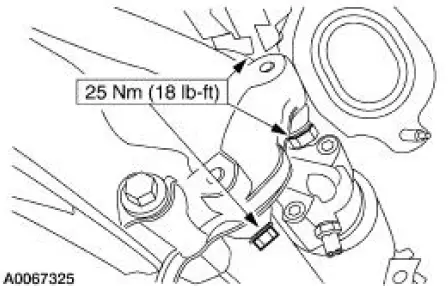
5. NOTE: To ease removal, remove the upper, concealed bolt first.
Remove the three starter motor bolts.
6. Remove the starter motor.
Installation
1. Position the starter motor to the engine.
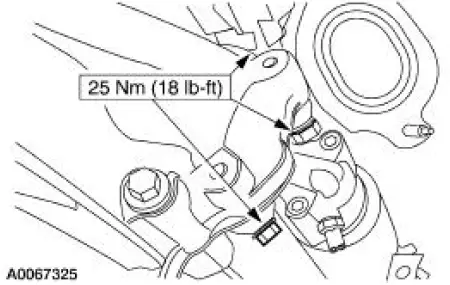
2. NOTE: To ease installation, first install the two lower bolts finger tight, then install the upper, concealed bolt. Tighten all three bolts to specification.
Install the three starter motor bolts.
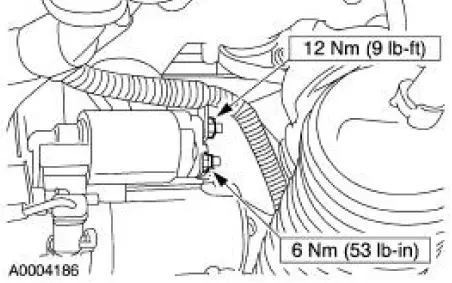
3. Connect the starter motor solenoid and starter motor cable connections.
4. Install the red starter solenoid safety cap.
5. Lower the vehicle.
6. Connect the battery ground cable.
 Starter Motor - 3.8L
Removal
WARNING: When servicing starter motor (11002) or carrying out other
underhood work in
the vicinity of the starter motor, be aware that the heavy gauge battery
input lead at the starter
...
 Engine Ignition - 3.8L
General Specifications
Torque Specifications
...
Other materials:
Connecting Rod - Bushing Diameter
1. Measure the inner diameter of the connecting rod bushing, if equipped.
Verify the diameter is
within specification.
Refer to the appropriate section in Group for the procedure.
If out of specification, install new components as necessary. Refer
...
Installation
WARNING: To reduce the risk of serious personal injury, read
and follow all warnings,
cautions and notes at the beginning of the removal procedure.
1. Disconnect the battery ground cable and wait at least one minute. For
additional information,
re ...
Starter Motor - 4.6L
Removal
WARNING: When servicing starter motor (11002) or carrying out other
underhood work in
the vicinity of the starter motor, be aware that the heavy gauge battery
input lead at the starter
solenoid (11390) is "electrically hot" at all times. A prote ...
