Ford Mustang (1999-2004) Service Manual: Wiper Blade and Pivot Arm Adjustment
1. Cycle and park the windshield wipers.
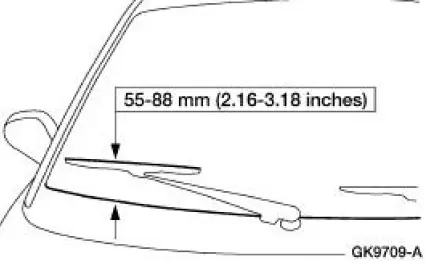
2. Verify that the distance between the center of the RH windshield wiper blade and the top edge of the cowl top vent panel is within specification.
3. Verify that the distance between the center of the LH windshield wiper blade and the top edge of the cowl top vent panel is within specification.
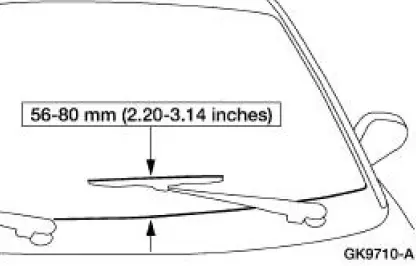
4. If the distance is not within specification, remove the windshield wiper pivot arms and reposition to specification.
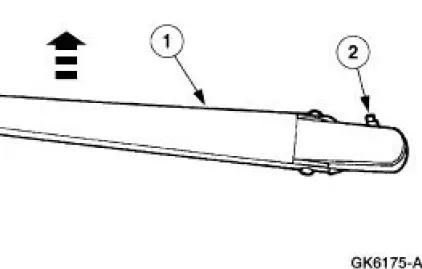
Remove the pivot arm.
1. Pull up on the pivot arm.
2. Pull out on the retainer tab and remove the pivot arm.

Pivot Arm
Removal
1. NOTE: New windshield wiper pivot arms need to be installed as an assembly.
Remove the pivot arm.
1. Pull up on the pivot arm.
2. Pull out on the retainer tab and remove the pivot arm.
Installation
1. To install, reverse the removal procedure.
 Component Test
Windshield Wiper Motor
CAUTION: Do not handle the wiper motor abusively when
diagnosing the wiper
operations. Failure to follow this caution may result in damage to the
motor magnets and wil ...
 Mounting Arm and Pivot Shaft
Removal
1. Park the windshield wipers in the full upright position. This will
allow for easy access to the
retaining clip on the wiper motor output shaft.
2. Remove the cowl top vent panels.
...
Other materials:
Axle Housing
Removal and Installation
1. CAUTION: The vehicle must be on level ground and at curb height.
Mark the rear shock absorbers relative to their protective sleeve.
During installation, raise the suspension to this reference mark
before tightening the
s ...
Noise, Vibration and Harshness (NVH) (Diagnosis and Testing)
Special Tool(s)
ChassisEAR
107-R2102 or equivalent
Electronic Vibration Analyzer
100-F027 (014-00344) or
equivalent
EngineEAR
107-R2100 or equivalent
Ultrasonic Leak Detector
134-R0135 or equivalent
T ...
Drive Pinion Flange and Drive Pinion Seal
Special Tool(s)
2-Jaw Puller
205-D072 (D97L-4221-A) or
equivalent
Holding Fixture, Drive Pinion
Flange
205-126 (T78P-4851-A)
Installer, Drive Pinion Flange
205-002 (TOOL-4858-E) or
equivalent
...
