
Ford Mustang (1999-2004) Service Manual: Driveshaft (Description and Operation)
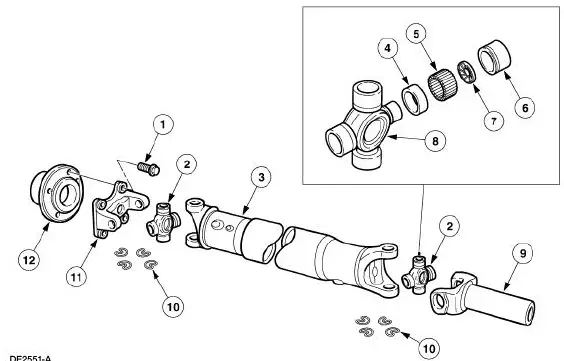
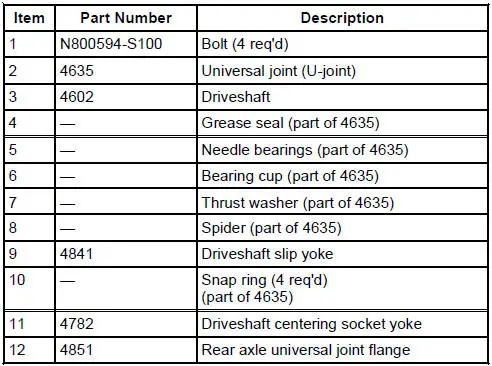
NOTE: All driveshaft assemblies are balanced. If undercoating the vehicle, protect the driveshaft to prevent overspray of any undercoating material.
The driveshaft has the following features:
- A tubular shaft used to transfer engine torque from the transmission output shaft to the differential in the rear axle housing, which transmits torque through the axle shafts to the drive wheels.
- Consists of two single-cardan universal joints, a driveshaft slip yoke, a welded tube assembly and a driveshaft centering socket yoke.
- The splined driveshaft slip yoke permits the driveshaft to move forward and rearward on the transmission output shaft during drivetrain movement and during driveshaft removal and installation.
 Driveshaft
Torque Specifications
Description
Nm
lb-ft
Pinion flange bolts
112
83
...
 Universal Joints
The universal joints are:
lubed-for-life design and require no lubrication.
equipped with nylon thrust washers, located at each base of the bearing
cup, which control end
play, position the need ...
Other materials:
Heater Core Backflushing
Special Tool(s)
Flush Kit
164-R3658 or equivalent
Drain Kit
164-R3662 or equivalent
Material
Item
Specification
Motorcraft Premium Cooling
System Flush
VC-1 or equivalent
ESR-M14P7-A
Motorcraft Premium ...
Exhaust Gas Recirculation (EGR) Valve
Removal and Installation
NOTE: The 4.6L, 2V is shown. The 3.8L is similar.
1. Disconnect the vacuum hose.
2. Disconnect the EGR tube from the EGR valve.
3. Remove the two bolts, the EGR valve and the gasket.
4. NOTE: Install a new gasket.
To install, ...
Sun visors
Slide-On-Rod
Rotate the visor toward the side
window and extend it rearward for
extra sunlight coverage.
Retract the visor before moving it
back toward the windshield and
storing it.
Illuminated Visor Vanity Mirror
Lift the cover to switch on the lamp.
Flex ...
