Ford Mustang (1999-2004) Service Manual: Heated Window Grid Wire Repair
Material
| Item | Specification |
| Dark Walnut Metallic Acrylic Lacquer Touch-up Paint ALBZ-19500-5858A or equivalent | ESR-M2-P100- C |
| Rear Window Defroster Repair D8AZ-19562-AA or equivalent | WSB-M4J58-B |
1. NOTE: A single break or any breaks which exceed 25 mm (1 inch) in one grid cannot be repaired. Install a new rear window glass.
NOTE: If the first layer of the heated rear window grid (brown) is damaged or missing, it will be necessary to apply touch-up paint on the glass prior to applying the silver rear window defroster repair.
Repair any inoperative grid wires using rear window defroster repair.
2. Bring the vehicle up to room temperature of at least 16 C (60 F) or above.
3. Clean the entire grid line repair area with a non-alcohol based window cleaner and 0000 steel wool.
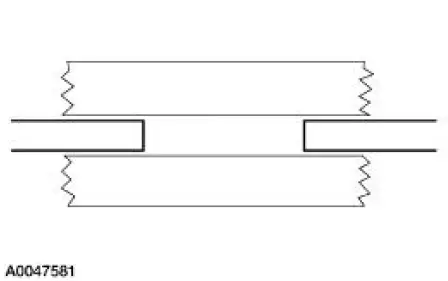
4. Mark the location of the grid break on the exterior of the rear window glass.
5. Using cellulose tape, mask the area directly above and below the grid break. The break area should be at the center of the mask.
6. NOTE: If the brown layer is not broken or missing, apply only the silver grid repair compound to the break.
NOTE: If both the brown and silver layers of the grid are broken or missing, apply a coating of the brown touch-up paint across the break in the grid line first. Do not overlap the silver grid line with the brown paint . Several applications may be necessary to achieve a color match.
NOTE: Extend the silver repair coating at least 6.35 mm (0.25 inch) on both sides of the break area.
NOTE: Allow at least five minutes of drying time between applications.
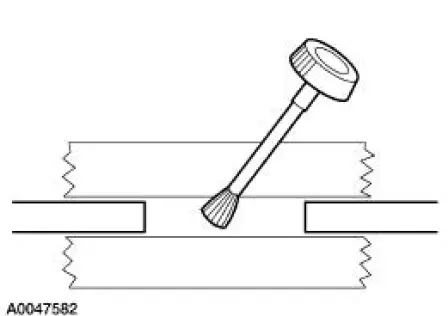
Apply the repair coating to the grid break area in several smooth, continuous strokes.
Apply three applications of the grid repair compound.
7. After five minutes or after the repair area has dried completely, remove the mask.
8. CAUTION: Be careful not to damage the grid line with the razor blade. If this occurs, additional repair may be necessary.
Remove any excess repair compound above or below the grid line with a razor blade.
9. NOTE: The repair coating will air-dry in approximately one minute and can be energized within three minutes.
NOTE: Optimum adhesion occurs after approximately 24 hours.
After optimum hardness is achieved, clean the repaired area with a non-alcohol based window cleaner.
 Component Tests
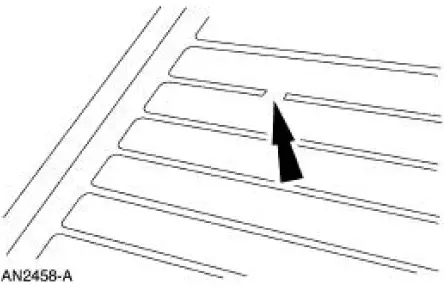
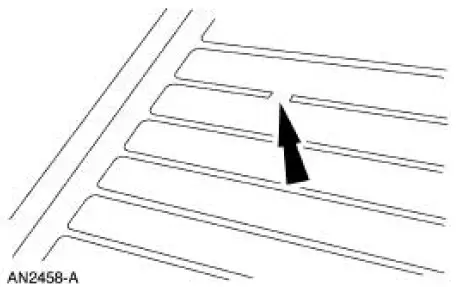
Grid Wire Test
1. Using a bright lamp inside the vehicle, inspect the wire grid from
the exterior. A broken grid wire
will appear as a brown spot.
2. Run the engine at idle. Set the rear win ...
 Lead Terminal Repair
Special Tool(s)
Heat Gun
107-R0300 or equivalent
Material
Item
Specification
Rear Window Defroster Repair
D8AZ-19562-AA
WSB-M4J58-B
1. NOTE: The rear window glass m ...
Other materials:
Final assembly
23. Install the differential assembly in the differential housing. For
additional information, refer to
Differential Case in this section.
24. CAUTION: Align the index marks.
CAUTION: Install the driveshaft with new bolts. If new bolts are not available,
a ...
Fuse specification chart
Power Distribution Box
WARNING: Always disconnect the battery before servicing high
current fuses.
WARNING: To reduce risk of electrical shock, always replace
the cover to the power distribution box before reconnecting the
battery or refilling fluid reservoirs ...
Release Cable - Clutch
Removal
CAUTION: Whenever the clutch release lever cable (7K553) is
disconnected for any
reason, such as transmission removal, clutch pedal components or clutch
release lever cable
replacement, it is imperative the correct method for installing the clut ...
