Ford Mustang (1999-2004) Service Manual: Intake Air Distribution and Filtering
Torque Specifications
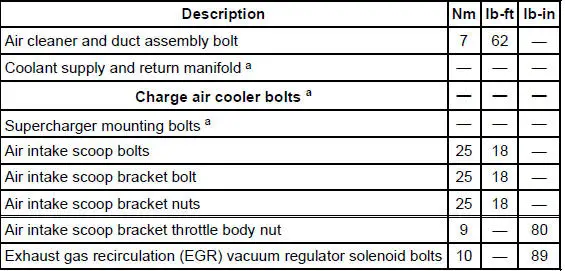
a - Refer to the procedure
Intake Air Distribution and Filtering (DESCRIPTION AND OPERATION)
The air intake system consists of the:
- air intake scoop (Mach I)
- air cleaner (ACL).
- air cleaner (ACL) element.
- mass air flow (MAF) sensor.
- air cleaner outlet tube.
- air cleaner and duct assembly.
The air intake system:
- cleans intake air with an air cleaner element.
- measures air flow with a MAF sensor.
- Intake Air Distribution and Filtering - Supercharger, Charge Air Cooler
- Air Cleaner Outlet Pipe - 3.8L
- Air Cleaner Outlet Pipe - 4.6L (4V)
- Air Cleaner - 3.8L
- Air Cleaner - 4.6L (2V) and 4.6L (4V)
- Air Cleaner Element - 3.8L
- Air Cleaner Element - 4.6L (2V)
- Air Intake Scoop
- Air Intake Scoop Bracket
- Charge Air Cooler
 Positive Crankcase Ventilation (PCV) Hose
Removal and Installation
1. Disconnect the hose on the PCV valve.
2. Twist and remove the PCV valve.
3. To install, reverse the removal procedure.
...
 Intake Air Distribution and Filtering - Supercharger,
Charge Air Cooler
Intake Air Distribution and Filtering - Supercharger,
Charge Air Cooler
The supercharger (SC) is a positive displacement pump. Its purpose is to
supply an excess volume of
intake air to the engine by increasing air pressure and density in the
intake manifold. The sup ...
Other materials:
Anti-Lock Control - Rear
Torque Specifications
Anti-Lock Control
The four wheel anti-lock brake system (4WABS) consists of the following
components:
anti-lock brake control module (2C346)
front anti-lock brake sensor (2C205)
front anti-lock brake sensor indicator (2C182)
...
Pinpoint Test P: No Communication With The Restraints Control Module
Normal Operation
The RCM communicates with the scan tool using ISO 9141 communication mode
through the data link
connector (DLC).
Possible Causes
A no communication condition can be caused by:
damage to circuit 70 (LB/WH).
a damaged DLC.
a damage ...
Navigation controls
Type 1
WARNING: Driving while distracted can result in loss of vehicle
control, crash and injury. We strongly recommend that you use
extreme caution when using any device that may take your focus off
the road. Your primary responsibility is the safe operation ...
