Ford Mustang (1999-2004) Service Manual: Piston - Pin Connecting Rod, Floating Pin
Material
| Item | Specification |
| SAE 5W-20 Premium Synthetic Blend Engine Oil XO-5W20-QSP | WSS-M2C153- H |
Disassembly
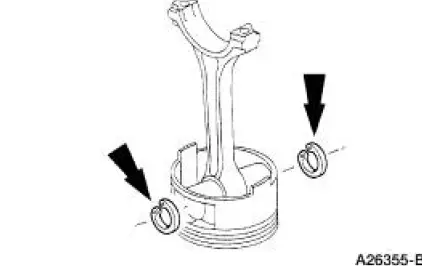
1. Remove the clips.
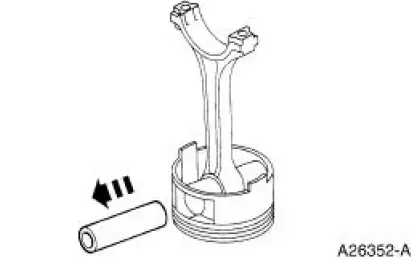
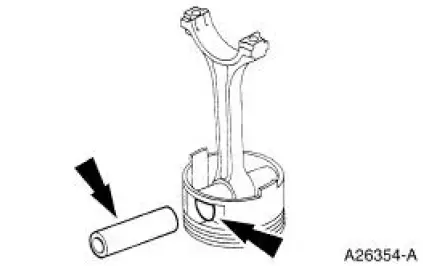
2. Remove the piston pin from the piston and connecting rod assembly.
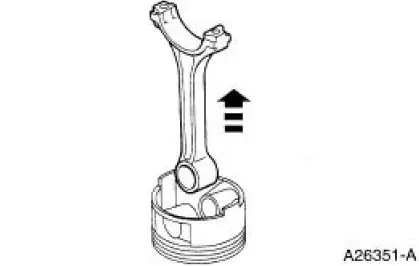
3. Remove the connecting rod from the piston.
4. Clean and inspect the piston and connecting rod. For additional information, refer to Section.
Assembly
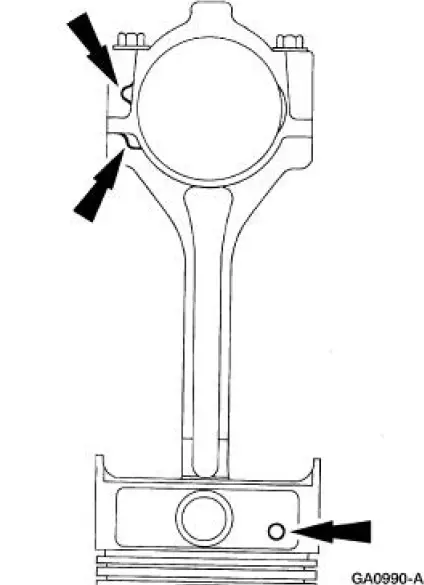
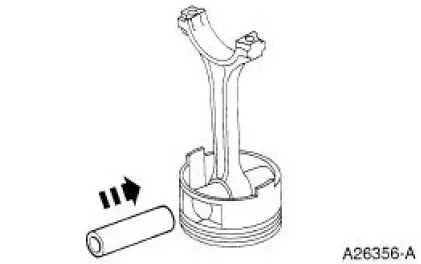
1. NOTE: Connecting rod must be installed into piston with identification markings toward front.
Position the connecting rod in the piston.
2. Lubricate the piston pin and pin bore with clean engine oil.
3. Install the piston pin in the piston and connecting rod assembly.
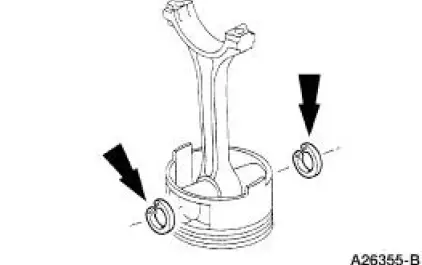
4. Install the piston pin retaining clips in the piston.
 Assembly
1. Install the valve stem seals.
2. Install the valves and the valve springs.
3. CAUTION: Make sure the tool is seated correctly on the valve spring.
Apply a small
amount of air at a time. This wil ...
 Engine (Assembly)
Special Tool(s)
Guides, Connecting Rod
303-442 (T93P-6136-A)
Installer, Crankshaft Vibration
Damper
303-102 (T74P-6316-B)
Installer, Front Cover Oil Seal
...
Other materials:
Installation
All axles
1. Position the ring gear and the differential case. Align the bolt holes by
starting two bolts through
the holes in the differential case and the ring gear. Press the ring gear on the
differential case.
2. Install the bolts.
Apply Stud and Bea ...
General information
Note: Occasional brake noise is normal. If a metal-to-metal,
continuous
grinding or continuous squeal sound is present, the brake linings may be
worn out. Have them inspected by an authorized dealer. If your vehicle
has continuous vibration or shudder in the ...
Disconnect
1. Remove the A/C tube lock coupling clip (19E746), if equipped.
2. Fit the special tool to the spring lock coupling.
3. Push the tool into the cage opening to release the female fitting from the
A/C tube lock coupling
spring (19E576).
4. Pull the sprin ...
