Ford Mustang (1999-2004) Service Manual: Rear Drive Axle/Differential - Ford 8.8-Inch Ring Gear
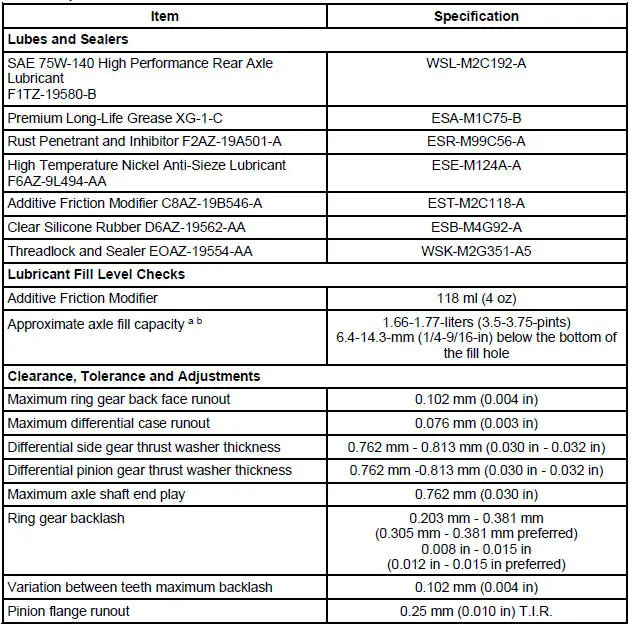
General Specifications
Torque Specifications
| Description | Nm | lb-ft | lb-in |
| Bolt retaining the differential pinion shaft to the differential case | 30 | 22 | - |
| Bolt retaining the driveshaft yoke to the pinion flange | 112 | 83 | - |
| Bolt retaining the differential housing cover to the differential housing | 44 | 32 | - |
| Oil filler plug | 30 | 22 | - |
| Pinion bearing preload (used pinion bearings) | 0.9-1.5 | - | 8-14 |
| Pinion bearing preload (new pinion bearings) | 1.8-3.3 | - | 16-29 |
| Adapter for 205-S127 | 2.2 | - | 20 |
| Bolt retaining the bearing cap to the differential case | 105 | 77 | - |
| Bolt retaining the ring gear to the differential case | 106 | 77 | - |
- Rear Drive Axle and Differential
- Rear Wheel Bearing and Axle Shaft Oil Seal
- Drive Pinion
- Differential Case
- Axle Housing
- Differential Case and Ring Gear - Conventional
- Differential Case and Ring Gear - Traction-Lok
 Assembly
1. Lubricate the differential side gear thrust washers and the differential
side gear journals, and
assemble the washers to the gears.
Use SAE 80W-90 Premium Rear Axle Lubricant XY-80W90-QL or equi ...
 Rear Drive Axle and Differential
The axle housing assembly consists of a cast center section with two
steel tube assemblies and
a stamped differential housing cover (4033). The differential housing cover
uses sili ...
Other materials:
Brake Caliper - Cobra
Removal
1. Raise and support the vehicle.
2. Remove the tire and wheel assembly.
3. Remove the caliper locating pin E-clip.
4. Remove the caliper locating pin.
5. Remove the front brake flow bolt.
6. Remove the caliper.
7. Remove the brake pa ...
Road Test
Verify the customer concern by carrying out a road test on a smooth road. If
any vibrations are
apparent.
To maximize tire performance, inspect for signs of incorrect inflation and
uneven wear, which may
indicate a need for balancing, rotation, or front susp ...
Pinpoint Test C: LFC 29/DTC C1414 - Incorrect Vehicle Identification Code
Normal Operation
The restraints control module (RCM) monitors the electrical state of pins
10, 13 and 14 to determine if
it is installed on the correct vehicle. If the RCM detects an incorrect
condition on any of these pins, it
will store a diagnostic t ...
