Ford Mustang (1999-2004) Service Manual: Thermostat - 4.6L(4V)
Material
| Item | Specification |
| Motorcraft Premium Gold Engine Coolant VC-7-A (in Oregon VC-7-B) (yellow color) | WSS-M97B51- A1 |
Removal and Installation
1. With the vehicle in neutral, position it on a hoist. For additional information, refer to Section.
2. Drain the engine coolant. For additional information, refer to Cooling System Draining, Filling and Bleeding in this section.
3. Remove the thermostat housing bolts.
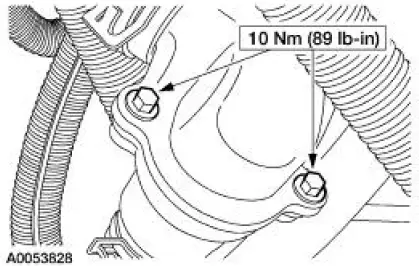
4. Remove the coolant thermostat.
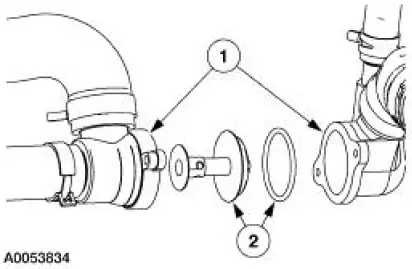
1. Separate the thermostat housing.
2. Remove the coolant thermostat and the O-ring seal.
- Inspect the O-ring seal. Install a new seal, if necessary.
5. NOTE: The thermostat is indexed and must be returned to the original location.
NOTE: Make sure the new O-ring seal is secure around the thermostat.
To install, reverse the removal procedure.
6. Fill the cooling system. For additional information, refer to Cooling System Draining, Filling and Bleeding in this section.
 Thermostat - 4.6L(2V)
Material
Item
Specification
Motorcraft Premium Gold
Engine Coolant
VC-7-A (in Oregon VC-7-B)
(yellow color)
WSS-M97B51-
A1
Removal and Installation
1. Drain the engine coola ...
 Bypass Tube - 3.8L
Material
Item
Specification
Motorcraft Premium Gold
Engine Coolant
VC-7-A (in Oregon VC-7-B)
(yellow color)
WSS-M97B51-
A1
Removal and Installation
1. Drain the engine coola ...
Other materials:
Mass Air Flow (MAF) Sensor - Mach I
Removal
CAUTION: The mass air flow (MAF) sensor hot wire sensing
element and housing are
calibrated as a unit and must be repaired as a complete assembly. Do not
damage the sensing
element (internal to housing) or possible failure to the mass air f ...
Under hood overview
3.7L V6 Engine
A. Battery
B. Engine oil dipstick
C. Engine oil filler cap
D. Brake fluid reservoir
E. Air filter assembly
F. Engine coolant reservoir
G. Windshield washer fluid reservoir
H. Power distribution box
5.0L V8 Engine
A. Battery
B. Engine oil fille ...
Transmission Description (Description and Operation)
The 4R70W has the following features:
Wide ratio gears
Four speeds
Rear wheel drive
Automatic
Electronic shift
Torque converter clutch control
Line pressure controls
The transmission uses Ravigneaux-style double-pinion gearset with ...
