Ford Mustang (1999-2004) Service Manual: Intake Air Distribution and Filtering
Torque Specifications
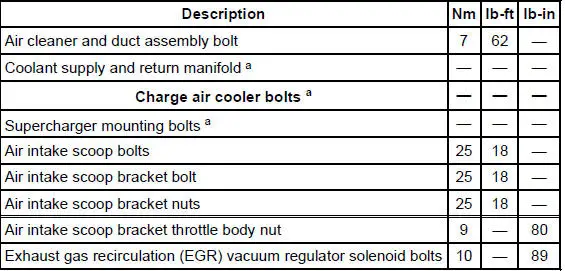
a - Refer to the procedure
Intake Air Distribution and Filtering (DESCRIPTION AND OPERATION)
The air intake system consists of the:
- air intake scoop (Mach I)
- air cleaner (ACL).
- air cleaner (ACL) element.
- mass air flow (MAF) sensor.
- air cleaner outlet tube.
- air cleaner and duct assembly.
The air intake system:
- cleans intake air with an air cleaner element.
- measures air flow with a MAF sensor.
- Intake Air Distribution and Filtering - Supercharger, Charge Air Cooler
- Air Cleaner Outlet Pipe - 3.8L
- Air Cleaner Outlet Pipe - 4.6L (4V)
- Air Cleaner - 3.8L
- Air Cleaner - 4.6L (2V) and 4.6L (4V)
- Air Cleaner Element - 3.8L
- Air Cleaner Element - 4.6L (2V)
- Air Intake Scoop
- Air Intake Scoop Bracket
- Charge Air Cooler
 Positive Crankcase Ventilation (PCV) Hose
Removal and Installation
1. Disconnect the hose on the PCV valve.
2. Twist and remove the PCV valve.
3. To install, reverse the removal procedure.
...
 Intake Air Distribution and Filtering - Supercharger,
Charge Air Cooler
Intake Air Distribution and Filtering - Supercharger,
Charge Air Cooler
The supercharger (SC) is a positive displacement pump. Its purpose is to
supply an excess volume of
intake air to the engine by increasing air pressure and density in the
intake manifold. The sup ...
Other materials:
Bumpers
Torque Specifications
Bumpers
CAUTION: Never apply excessive heat to the bumper cover surface. Heat
could cause
distortion of the bumper cover.
The bumper systems consist of the following components:
front bumper
front bumper cover
front bumper cover (Co ...
Link - Stabilizer Bar
Removal
CAUTION: Suspension fasteners are critical parts because they affect
performance of vital
components and systems and their failure can result in major service expense. A
new part with
the same part number or an equivalent part must be installed, if i ...
Radiator
Material
Item
Specification
Motorcraft Premium Gold
Engine Coolant
VC-7-A (in Oregon VC-7-B)
(yellow color)
WSS-M97B51-
A1
Removal and Installation
NOTE: Radiator removal and installation is similar for both 3.8L and
4.6L vehicles. ...
